GUI Editor
The Inspiration
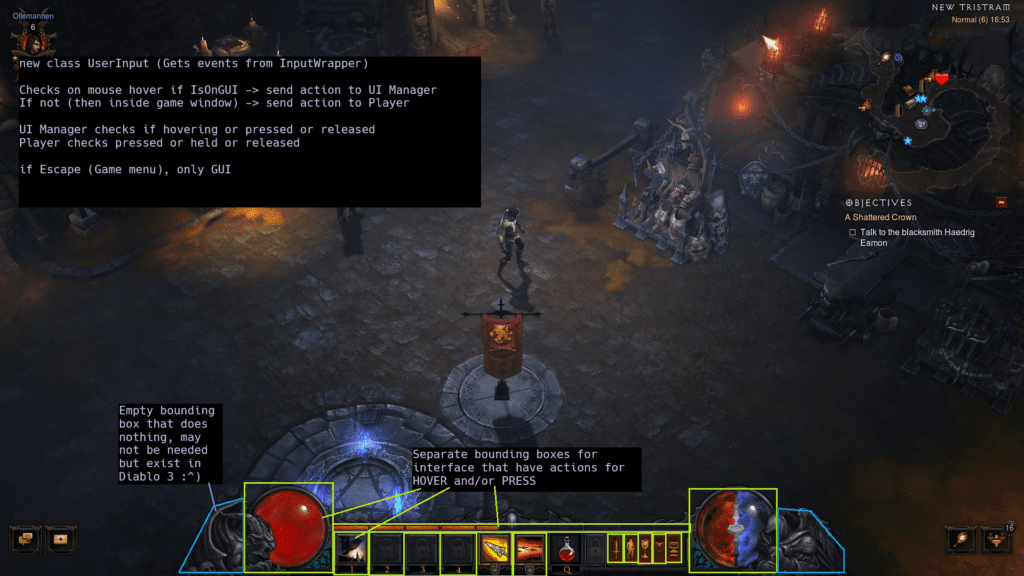
During our project Spite – A Hymn of Hate (a Diablo 3-inspired game) I foresaw a need of having a graphical user interface (GUI) system early on, since interacting with the GUI is an integral part of the game.
During development, our group had to overcome certain challenges together which required me to switch my focus from the GUI system and help out in other areas. This meant that the GUI system, even though it was fully functional, was a bit tedious to work with and had to be hardcoded specifically for the project. So, for our next project Harbor Havoc my goal was to create a GUI editor intuitive enough for anyone in the team to use.

The Implementation
I first broke down the different components of the GUI system:
-
GUIElement– Contains an interactable AABB box, a sprite, and has a type so that it can be updated or send an event when interacted with. -
GUIScene– Each scene contains all elements relevant to each other, for example the player’s HUD or the main menu. -
GUIHandler– The class that has ownership of all things GUI related. Handles creation and loading of scenes. All incoming and outgoing communication is event driven.
When I started exposing the GUI system to our custom editor created by Assar Bergh, I had already setup the GUI system with this in mind. I wanted it to be flexible and easy to work with from the beginning.
I was creating scenes and elements at startup in the previous project, so it was simple enough to call the same functions when creating them in the editor. I only had to add the Remove functions.
// GUIHandler class
void CreateGUIScene(const std::string& aSceneName, const size_t aNumberOfElementsToReserve);
void RemoveGUIScene(const std::string& aSceneName);
void AssignSpriteToGUIElement(GUIElement& aElement,
                              Graphics* aGraphics,
                              const Vector2f& aElementSize,
                              const std::string& aSpritePath);

// GUIScene class
GUIElement& CreateGUIElement(const Vector2f& aSize,
			                       const Vector2f& aOffset,
			                       const Vector2f& aScreenResolution,
			                       const eGUIElementType aGUIElementType,
			                       const bool aIsClickable,
			                       const eAlignType aAlignType,
			                       const eProgressionDirection aDirection = eProgressionDirection::None);
void RemoveElement(const size_t aIndex);
All scenes are then stored in an unordered map because its contents will remain static and memory will not be an issue.
The active scenes are stored as pointers in a deque so that I easily can push and pop scenes and render them in the correct order. The reason I chose a deque instead of a stack is purely out of convenience when clearing the deque or removing a specific scene.
std::unordered_map<std::string, GUIScene> myGUISceneMap = {};
std::deque<GUIScene*> myActiveGUIScenes = {};
The first element
I had to start somewhere. So I created a GUIEditor class that could be easily hooked into our editor. From there I called the function to create a scene and an element, and a few exposed variables so that I could edit the size, position and image of the element.
Save & load
The next thing I did was to setup saving and loading functionality to a json file format. I made a GUIFile class with a Save and a Load function to save data to a text format that can be easily edited if needed. There are buttons to save and load in the editor. Scenes and elements can be renamed, the editor makes sure the name is unique.
The data structures to save and load scenes and elements:
struct GUIElementData
{
	  // Element
	  std::string myName;
	  std::string myTexturePath;
	  std::string mySecondaryTexturePath;
	  int myType;
	  int myAlignType;
	  int myProgressionDirection;
	  bool isButton;
	  // Box
	  Vector2f myOffsetResolutionFactor;
	  Vector2f mySizeResolutionFactor;
};

struct GUISceneData
{
		std::string myName;
		std::vector<GUIElementData> myElements;
};
A scene and an element in json:
"name": "PlayerHud",
"elements": [
    {
        "name": "Portrait",
        "texturePath": "Data\\Assets\\UI\\02_UI_InGame\\ui_playerResource_container.dds",
        "secondaryTexturePath": "Data\\Assets\\UI\\02_UI_InGame\\ui_playerResource_container.dds",
        "type": 0,
        "alignType": 6,
        "progressionDirection": 1,
        "button": false,
        "offsetResolutionFactor": {
            "x": 0.00520833395421505,
            "y": 0.1666666716337204
        },
        "sizeResolutionFactor": {
            "x": 0.2083333134651184,
            "y": 0.18518516421318054
        }
    },
I chose to save the offset and size as a factor of the resolution so that I easily can change resolution and the GUI resizes automatically. There will be some floating point precision issues if the resolution is changed too many times, but it’s not obvious in this case and won’t cause any issues that affects gameplay.
Building the GUI
I wanted to make it possible for others in the group to be able to create and edit the GUI. I worked together with a graphical artist to create the scenes and with the workflow the GUI editor provided we finished blockouts of all the scenes in under an hour. All that was left was to iterate on the art and apply functionality to the different elements.
The GUIEditor class handles the ImGui editor window and its functionality. When creating a scene we first check if a scene already exists with that name, if so it adds _X at the end of the name corresponding to the number of the duplicate.
The scene is then selected and we can start creating elements in the scene.
if (ImGui::InputTextWithHint("##newGuiScene", "New GUIScene", sceneInputBuffer, 64,
			                              ImGuiInputTextFlags_EnterReturnsTrue))
{
		std::string sceneName = sceneInputBuffer;
		memset(sceneInputBuffer, 0, 64);

		RenameNotUniqueSceneName(myGUIHandler, sceneName);

		myGUIHandler->CreateGUIScene(sceneName);
		mySelectedGUIScene = &myGUIHandler->GetGUIScene(sceneName);
		myGUIHandler->PushGUIScene(sceneName);
}
Creating an element is similar, only we need to set a few default variables when creating the element and assign a default sprite. The resolution is passed as a parameter so that the element can calculate its resolution factor based on its current offset/size and original resolution.
if (ImGui::InputTextWithHint("##newGuiElement", "New GUIElement", elementInputBuffer, 64,
		                              ImGuiInputTextFlags_EnterReturnsTrue))
{
		std::string elementName = elementInputBuffer;
		memset(elementInputBuffer, 0, 64);

		Vector2f size = { 100.0f, 100.0f };
		Vector2f offset = { 0.0f, 0.0f };
		Vector2f resolution = { (float)myGUIHandler->myGraphics->GetRenderSize().x,
		                        (float)myGUIHandler->myGraphics->GetRenderSize().y };

		aGuiScene->CreateGUIElement(
				size,
				offset,
				resolution,
				KE::eGUIElementType::Decoration,
				false,
				KE::eAlignType::Center
		);

		RenameNotUniqueElementName(aGuiScene, elementName);

		aGuiScene->GetGUIElements().back().myName = elementName;

		myGUIHandler->AssignSpriteToGUIElement(
				aGuiScene->GetGUIElements().back(),
				myGUIHandler->myGraphics,
				{ 100.0f, 100.0f },
				"Data\\Assets\\PNGs\\coolguy.png");

		mySelectedGUIElement = &aGuiScene->GetGUIElements().back();
		mySelectedElementIndex = aGuiScene->GetGUIElements().size() - 1;
}
Functionality
When the cursor hovers over an element, it activates its Highlight function, and when it is pressed it activates its Click function. When the cursor stops hovering over an element its Reset function is called.
void GUIElement::Click()
{
    ES::EventSystem::GetInstance().QueueEvent(myEvent);
}

void GUIElement::Highlight()
{
    if (myState == eGUIElementState::Pressed)
		{
			  return;
		}
		myState = eGUIElementState::Hovered;

		if (mySecondaryTexture != myDisplayTexture)
		{
			  mySpriteBatch.myData.myTexture = mySecondaryTexture;
		}
}

void GUIElement::Reset()
{
		myState = eGUIElementState::Idle;

		if (mySecondaryTexture != myDisplayTexture)
		{
			  mySpriteBatch.myData.myTexture = myDisplayTexture;
		}
}
This is handled by the GUIHandler that gets the event from UserInput, the class that decides whether input should be sent as a GUIEvent or a PlayerEvent:
	/// -----------------------------------------------------------------------------------------------
	///	GUI EVENT
	if (GUIEvent* event = dynamic_cast<GUIEvent*>(&aEvent))
	{
			const Vector2f mousePosition = {
				  static_cast<float>(event->myMousePosition.x), static_cast<float>(event->myMousePosition.y)
			};

			/// -----------------------------------------------------------------------------------------------
			///	Pressed
			if ((event->myInputType == eInputType::LeftClick ||
				   event->myInputType == eInputType::RightClick) &&
				   event->myInteractionType == eInteractionType::Pressed)
			{
				  GUIElement* element = GetGUIElementFromMousePosition(mousePosition);
				  if (element && element->isButton)
				  {
					    element->Click();
				  }
			}

			/// -----------------------------------------------------------------------------------------------
			///	Released
			if ((event->myInputType == eInputType::LeftClick ||
				   event->myInputType == eInputType::RightClick) &&
				   event->myInteractionType == eInteractionType::Released)
			{
				  GUIElement* element = GetGUIElementFromMousePosition(mousePosition);
				  if (element && element->isButton)
				  {
					    element->Reset();
					    element->Highlight();
				  }
			}

			/// -----------------------------------------------------------------------------------------------
			/// Hovered
			if (event->myInteractionType == eInteractionType::Hovered)
			{
				  GUIElement* element = GetGUIElementFromMousePosition(mousePosition);
				  if (element)
				  {
					    element->Highlight();
				  }
			}
	}
Minimap
We chose Orcs Must Die 2 as the reference game for our project Harbor Havoc. In Orcs Must Die 2, a third-person tower defense game, a vital part of gameplay is knowing where the enemies are coming from so the player knows where to defend. The player gets this information via a minimap. Our group wanted one, and I wanted to make one!
In our previous project I used a sprite batch for all the health bars above the enemies’ heads and figured I could do something similar for the minimap. So when an enemy spawns it sends an event with its position. The Minimap class then adds an instance to the sprite batch for the enemy icons. The enemies send a new event on an interval, as to not send them every frame.
Their position is converted to a position that fits the minimap. I’m sure there is a better way to do this, but what I came up with and what works for me is this:
myMapZeroPos = { myMap->myBox.myWidth * (1.0f - myFactorX),
                -myMap->myBox.myHeight * (1.0f - myFactorY) };
myScale = { myMap->myBox.myWidth / myScaleX,
            myMap->myBox.myHeight / myScaleY };
myMapOffset = myMapZeroPos + myMap->myBox.myScreenPosition;

auto& spriteBatch = myEnemy->mySpriteBatch.myInstances;

for (size_t i = 0; i < myEnemyPositions.size(); ++i)
{
		Vector3f scaledEnemyPosition =
		{
  			1.0f - myEnemyPositions[i].x * -scale.x + mapOffset.x,
	  		1.0f - myEnemyPositions[i].z * scale.y + mapOffset.y,
		  	0.0f,
		};

		if (i < spriteBatch.size())
		{
			  spriteBatch[i].SetPosition(scaledEnemyPosition);
			  spriteBatch[i].SetScale({ myEnemy->myBox.myWidth,
			                            myEnemy->myBox.myHeight,
			                            1.0f });
		}
}- I get the position inside the minimap that I consider to be (0,0).
- I set the scale according to what relation needs to be for the icons on the minimap.
- I then set the offset in relation to the minimap’s screen position.
- The scaled enemy position is then the enemy’s position converted from world space to minimap space.
Closing Thoughts
The GUI editor has made creating blockouts and refining the GUI a much simpler and faster process. But there are still some things I could improve for our next and final project, such as being able to easily create events for buttons and setting triggers on scenes or elements when they should show or hide. Currently I still have to do a lot of setup in code, but my goal is to be able to do everything inside the engine.
